EnvoyProxy 5: Authorized Access with JWT

Table of Contents
- Abstract
- Introduction
- Authorization via Signed Session Information
- Configuring Envoy to Authorize Endpoints with a JWT
- Conclusions
Abstract
The purpose of this article is to explain how to use technologies is to validate that users are who they claim to be (authentication) and to determine what resources that user has permission to access (authorization). This is done by expanding upon the protections against man-in-the-middle and eavesdropping attacks that are obtained with the usage of HTTPS, and further explaining JSON Web Tokens, validating them using JSON Web Keys, and briefly explains how they can be requested and used with OpenID Connect compatible services.
Introduction
In our previous post, Securing Connections with HTTPS, we discussed how important it was to use encryption to prevent outsiders from intercepting your communication and reading sensitive data from it, and how important it was to use digitally signed certificates which originate from a trusted certificate authority to make sure that clients are indeed talking to your service, and not someone pretending to be your service.
However, there were several additional kinds of attacks to be aware of that were discussed in the post Introduction to Network Security. For example, a user can use a perfectly secure and encrypted HTTPS channel to connect to your system, and they themselves might be the attacker. They might try to access services they are not authorized to, or they may attempt to access the data of other users.
Unlike authentication, which checks if parties really are who they claim to be, we have now introduced the problem of authorization, that is, is a client allowed to do what they are asking to do? That is the problem to be addressed in this article.

Authorization via Signed Session Information
Why use JWT?
In Introduction to Network Security, we talked about 3 possible ways of doing this:
- Authenticate Every Request: Every request requires a user to provide authentication factors, i.e. secret information to prove they are the same person that created the account, e.g. a password or a thumbprint.
- User a Server-Side Session: Ask for authentication factors only once (such as a /login request), and then give the user a hard to guess session ID, and then on the server-side, associate this session ID with information about the user, for use in subsequent requests.
- Use Signed Session Information: Ask for authentication factors only once (such as a /login request), and then give the user information about their account in a digitally signed form, which they can provide alongside subsequent requests.
In this article, we’re going to talk about option 3, having the user login to obtain digitally signed session information, such as the user ID, account type, etc., and then this information is passed alongside each new request to authorize it.

It may seem strange, at first, to put information in a user’s hands directly like this. What if they just try to modify it, by changing the user ID to a different one? This trick, however, will not work, because the session information is digitally signed. Any attempt to modify it will result in a failure for the signature to validate, and the server can reject the request. To prevent people from copying such information to use at a later date, this session information is almost always encoded with an expiration date, after which it is no longer considered to be valid.
So why are we considering options 3 (signed session information) and not option 2 (session-id linked to server-side information)? There’s a few advantages it has:
- Internet Standards Exist: Standard for exchanging signed session information, such as RFC 7519, which defines JSON Web Tokens (JWT), already solve a ton of the common problems one may face.
- Few Dependencies: When a server receives session information, just as a JSON Web Token, no call to another system that saves session information is required. This can lead to more efficient and simpler server software.
- Use Existing Tools: Related to the fact that there are common standards, this means that software tools exist that already have pre-existing knowledge of formats like JWT. Envoy is among them.
What is a JWT?
Let’s build up from the bottom to quickly explain what JWT is. The term means “JSON Web Token”, but to understand this term, you must first know what JSON is.
What is JSON?
Let’s start with JSON. The abbreviation JSON is short for “JavaScript Object Notation”. JavaScript is a high level programming language that adheres to the ECMAScript standard, that is a core technology of the World Wide Web, alongside HTML and CSS.

JavaScript has a few data types, including strings, numbers, arrays, and objects. Objects have named attributes with values that can be any type, including other objects. When creating an object in JavaScript, there is an object literal syntax that lets you simply type in the value for that object, for example:
a = {
name: "Jimmy",
age: 28,
rating: 3.5,
address: {
streetName: "Sesame Street",
houseNumber: 20
}
}Code language: JavaScript (javascript)This object literal syntax, a subset of the JavaScript language, is actually what JavaScript Object Notation (JSON) is. It is frequently used as a method of serializing and de-serializing data in textual form. It certainly isn’t the most efficient way to transmit data, but it has numerous advantages including: being human readable, being easy to work with, and being easy to debug.
Structure of a JWT
Now that we know what JSON is, a JSON Web Token (JWT) is a way of sharing digitally signed information to a user, it is based on JSON format, and it has a standard definition in RFC 7519.
Typically a JWT is included as part of the response to a web request to login. The user provides credentials, such as their username and their password, and the response they receive will be a JSON object. One of the fields of that JSON object will be a JWT, often referred to as an “Access Tokens” when used with an OAuth2 compatible system.
However, when one obtains a JWT / Access Token, it doesn’t look like JSON, in fact, it looks something like this:
eyJhbGciOiJIUzI1NiIsInR5cCI6IkpXVCJ9.eyJzdWIiOiIxMjM0NTY3ODkwIiwibmFtZSI6IkpvaG4gRG9lIiwiaWF0IjoxNTE2MjM5MDIyfQ.XOHs619Krkxp3LKBFYa3afSdE5NtDUzj40VNIcP08DYCode language: CSS (css)It looks like junk, no? Well, there is method to this madness. JSON Web Tokens are kept in a form that makes them easy to validate without having to slow down performance of a system by parsing a JSON object.
Their format is roughly:<header>.<payload>.<signature>
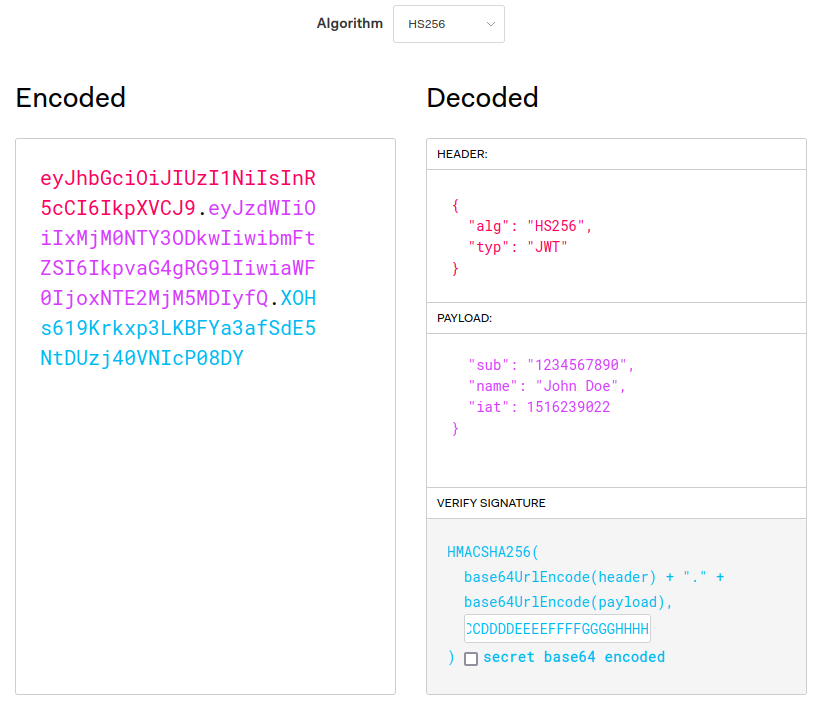
JWT Header
That only partially helps. Ok, so we know that the “header” has a value of “eyJhbGciOiJIUzI1NiIsInR5cCI6IkpXVCJ9”, which still looks like junk.
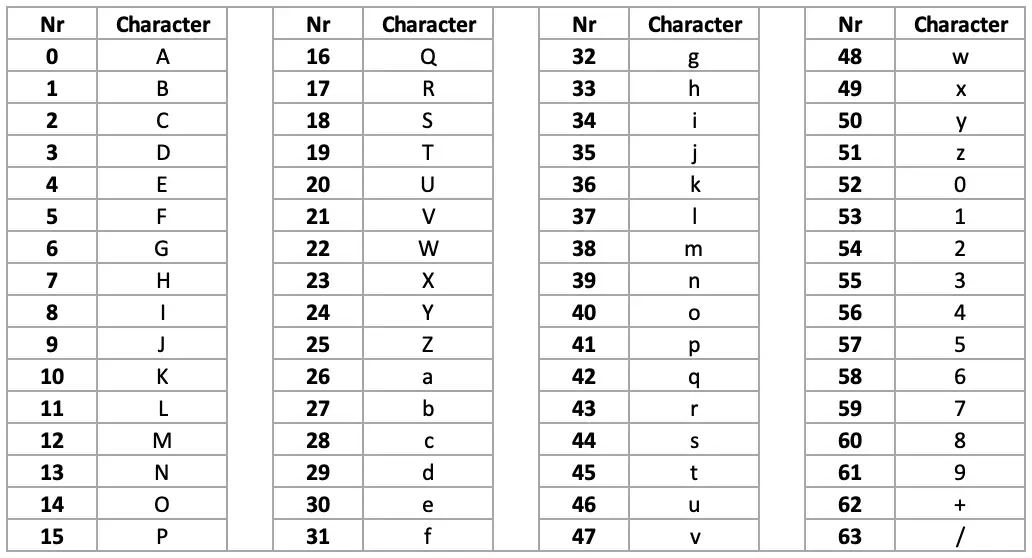
This is because the header and the payload sections of the JWT are actually base64-encoded. Numerical values from 0 to 63 are encoded as A-Z, a-z, 0-9, +, or /. If padding is needed, because the base64 value is meant to have a length that is a multiple of 4, or some other reason, then the = character is used for that.
There is a standard tool available on any Linux/Unix shell called base64, and this tool can be used to do our decoding for us. Taking our header value, we get:
$ echo -n "eyJhbGciOiJIUzI1NiIsInR5cCI6IkpXVCJ9" | base64 -d
{"alg":"HS256","typ":"JWT"}Code language: PHP (php)
There we go, there’s our hidden JSON.
JWT Payload
What’s in the payload? That’s pretty neat, we see that there is a field “typ” which says “JWT”, probably indicating that this object is a JWT object. But what is “alg”? In this case, “alg” indicates the algorithm used to generate the signature, in this case it is HMAC SHA-256, which we will get to later.
$ echo -n "eyJzdWIiOiIxMjM0NTY3ODkwIiwibmFtZSI6IkpvaG4gRG9lIiwiaWF0IjoxNTE2MjM5MDIyfQ==" | base64 -d
{"sub":"1234567890","name":"John Doe","iat":1516239022}Code language: PHP (php)
This gives more information, we see a few fields, which in RFC 7519 are called “claims”.
- sub: Short for “Subject”, it’s a unique identifier from a given issuer (e.g. an organization like “myservice.com”), for the “thing” that the other claims describe. In practice, it is typically a user ID.
- name: This is a custom claim added by whomever created this JWT. Arbitrary claims / data are permitted to be added to JWTs, and they can be used for things like a user’s name, their account tier, or any other information that might be useful for back-end services or for routing.
- iat: Short for “Issued At”, this is a date for when the JWT was created. It is a Unix timestamp, that is, the number of seconds since 1970-01-01 00:00:00 UTC.
JWT Signature
Finally we get to the last part of the JWT, the signature, which has a lovely value of XOHs619Krkxp3LKBFYa3afSdE5NtDUzj40VNIcP08DY.
Where the heck did that value come from? According to RFC 7519, this value comes from using the HMAC SHA-256 algorithm on the input:
<header>.<payload>Code language: HTML, XML (xml)As a quick note for readers who are not super familiar with all these acronyms, let’s explain a few:
- MAC: Message Authentication Code. In short, it’s a small piece of information used to validate that a message has not been altered.
- HMAC: Hash Message Authentication Code. This is a specific kind of Message Authentication Code that uses a cryptographic hashing function, that uses a secret key. A key must be known to use a cryptographic hashing function. In this case, the 256-bit key was the string “AAAABBBBCCCCDDDDEEEEFFFFGGGGHHHH”.
- SHA-256: SHA-256 is a specific type of cryptographic hashing function that was originally developed by the American National Security Agency.
From these terms, we expect to have some kind of data input, apply a cryptographic hashing function, give that function a special secret key, and then get our <signature> value from all this.
Let’s try it out using some Unix command-line tools:
# Produce the message from <header>.<payload>
echo -n "eyJhbGciOiJIUzI1NiIsInR5cCI6IkpXVCJ9.eyJzdWIiOiIxMjM0NTY3ODkwIiwibmFtZSI6IkpvaG4gRG9lIiwiaWF0IjoxNTE2MjM5MDIyfQ" \
  # Use the openssl to apply the SHA-256 algorithm with our secret key.
  | openssl dgst -sha256 -r -hmac "AAAABBBBCCCCDDDDEEEEFFFFGGGGHHHH" \
  # The output is: <hexadecimal digest> *stdin
  # We only want that hexadecimal digest.
  | cut -f1 -d' ' \
  # Convert the hexadecimal to raw bytes.
  | xxd -r -p \
  # Finally convert the raw bytes into base64, which RFC 7519 desires.
  | base64

XOHs619Krkxp3LKBFYa3afSdE5NtDUzj40VNIcP08DY=Code language: PHP (php)
With the exception of that extra “=” at the end (which indicates padding), this matches the signature we saw in our original JWT. You can play with these values yourself at https://jwt.io/, using the default header and payload values and setting the secret to “AAAABBBBCCCCDDDDEEEEFFFFGGGGHHHH”.
That secret key, used by the HMAC algorithm, is what is needed to compute what the signature value should be. If you do not have this key, there is no computationally feasible way to compute it.
This is actually a major flaw associated with the HMAC SHA-256 encryption algorithm in the context of a JWT. Because the algorithm is symmetric, the same information needed to verify the JWT is the same information needed to do the signature, you cannot give out the ability to verify also giving out the ability to create new signatures. Most real systems use asymmetric algorithms like RSA.
Obtaining a JWT / Logging In
Using Keycloak and OpenID Connect
There are many systems that use JWT tokens, and one of the most popular ways to authenticate a user is a OpenID Connect, which is an implementation of the OAuth 2.0 specification, with additional specifications specially focused on the problem of authenticating users. A popular software project that implements the OpenID Connect protocol (among others) is Keycloak.
Setting up an OpenID Connect server is out of scope for this article, so for illustration purposes, we will simply borrow one that already exists.
At Funnel-Labs.io, one product is the Funnel System, which is a real-time data-store optimized for high volumes of updates and SQL-like queries. This system has a demo account that is publicly accessible, which is used in the Live Demo.

Let’s borrow that demo user in order to obtain a JWT token that we can play with.
$ curl -s -X POST https://auth.funnel-labs.io/auth/realms/funnel/protocol/openid-connect/token -d "client_id=service&username=demo&password=abcd1234&grant_type=password" | jq
{
  "access_token": "eyJhbGciOiJSUzI1NiIsInR5cCIgOiAiSldUIiwia2lkIiA6ICJRaW82dDFnWGpsZlFCQ3dYOHpqdHowbGhGRXdXMkl1enMxM2FzUXpRc1ZZIn0.eyJleHAiOjE2NjYyNTcxNTAsImlhdCI6MTY2NjI1Njg1MCwianRpIjoiOWIxNDkzYzUtZGQ5YS00MjRmLTliNGYtN2ExYzZiMjA0MDYxIiwiaXNzIjoiaHR0cHM6Ly9hdXRoLmZ1bm5lbC1sYWJzLmlvL2F1dGgvcmVhbG1zL2Z1bm5lbCIsInN1YiI6IjIwNjczYmQ2LTJkYWQtNDA1Ny1iZGExLTg0Y2I0ZmE3M2ZhYiIsInR5cCI6IkJlYXJlciIsImF6cCI6InNlcnZpY2UiLCJzZXNzaW9uX3N0YXRlIjoiZDJhMjYzZTItOTUyMC00MTVhLTk3MDItNGNmZTE5NzViYzQ3IiwiYWNyIjoiMSIsInNjb3BlIjoiZnVubmVsLXNwb3V0IGZ1bm5lbC1tb3V0aCIsInNpZCI6ImQyYTI2M2UyLTk1MjAtNDE1YS05NzAyLTRjZmUxOTc1YmM0NyIsIm5hbWVzcGFjZXMiOlsiZnVubmVsIiwiY29tLmV4YW1wbGUiXSwidXNlcm5hbWUiOiJkZW1vIn0.UEaDN5hP9M-iVm2Eo51JzsNUcXbEkj4ZpQIv10PWVhrM7SOuMr3TZ3Xbx86YfjN-gZMJ4DAC1m_86Jle7D0pKCsc6lf0QYqxOM3VuSd4mpflLJxwu83neC4nOAOpEWFL9cy9bZvL14kLqFpXCU9haei4MVua7VtPr-L2iP8vTcIPNkNLKA7pzKE-XKFSmDlCfoQW77YrQn3RoDyc2fyop30PM0CXWw5AJaxCDGYVNBw1xUWtnBBQlQp9UG3hQBdSfn150ZoBPK0ViNXgrc1KxaRZIbAbhbLRJwIMc6clR5nln7NrPhct0xNW_KA_GC18R-7hdDVKibhOwP8gVBzyrw",
  "expires_in": 300,
  "refresh_expires_in": 1800,
  "refresh_token": "eyJhbGciOiJIUzI1NiIsInR5cCIgOiAiSldUIiwia2lkIiA6ICIyOTYyMTZlNy03NDE3LTRiODQtODRmOC0xNTQyZDQ0MjliZTMifQ.eyJleHAiOjE2NjYyNTg2NTAsImlhdCI6MTY2NjI1Njg1MCwianRpIjoiODIxMTM3NzgtYWU3NS00ZGEyLThjYmQtMjBiZjlkZWE3ZjRkIiwiaXNzIjoiaHR0cHM6Ly9hdXRoLmZ1bm5lbC1sYWJzLmlvL2F1dGgvcmVhbG1zL2Z1bm5lbCIsImF1ZCI6Imh0dHBzOi8vYXV0aC5mdW5uZWwtbGFicy5pby9hdXRoL3JlYWxtcy9mdW5uZWwiLCJzdWIiOiIyMDY3M2JkNi0yZGFkLTQwNTctYmRhMS04NGNiNGZhNzNmYWIiLCJ0eXAiOiJSZWZyZXNoIiwiYXpwIjoic2VydmljZSIsInNlc3Npb25fc3RhdGUiOiJkMmEyNjNlMi05NTIwLTQxNWEtOTcwMi00Y2ZlMTk3NWJjNDciLCJzY29wZSI6ImZ1bm5lbC1zcG91dCBmdW5uZWwtbW91dGgiLCJzaWQiOiJkMmEyNjNlMi05NTIwLTQxNWEtOTcwMi00Y2ZlMTk3NWJjNDcifQ.Nhz1WPP_p9uXLKRZwmkZownh1_K4UAXjplXxqOEKevU",
  "token_type": "Bearer",
  "not-before-policy": 0,
  "session_state": "d2a263e2-9520-415a-9702-4cfe1975bc47",
  "scope": "funnel-spout funnel-mouth"
}Code language: JavaScript (javascript)
The request for a JWT is a simple HTML form request with content type application/x-www-form-urlencoded to https://auth.funnel-labs.io/auth/realms/funnel/protocol/openid-connect/token. The server is at auth.funnel-labs.io. Keycloak can support many realms, so the first part of the path is the realm associated with this product, i.e. /auth/realms/funnel. Keycloak also supports many protocols in addition to OpenID Connect, thus, the /protocol/openid-connect part of the URL is present. Finally, the /token part of the URL comes from the OpenID Connect token specification.
The form fields that were submitted are relatively straight forward:
- grant_type: There are many ways to obtain credentials in addition to passwords, including a
refresh_token(which lets you extend a session) or anauthorization_code(which allows a user to grant access to a 3rd party without sharing their password). - username: Because we are using a password grant, we must say which user this is for. In this case, the username is “demo”.
- password: The demo account is freely available and the password is no secret. But you might be wondering, “If we put the password in the HTTP request, can’t that be discovered by an eavesdropper?” The answer to that is no, because we’re using HTTPS and not HTTP! HTTPS wraps HTTP communication in a TLS encrypted tunnel, meaning that the only information an eavesdropper could see would be the host we are connecting to and the port number, and nothing else.
The response from our request has many fields, not just our JWT. These fields are standardized as part of the OpenID Connect protocol, but let’s briefly review them:
- access_token: That’s our JWT that we can start using immediately!
- expires_in: A convenience field to see how long the JWT is valid before you have to get a new one.
- refresh_expires_in: Instead of using the password, you can use the Refresh Token to obtain a new Access Token. Typically a system will have the user login once, throw away the password the user entered, and then only use the refresh_token to keep the session alive.
- refresh_token: This value can be used at the /token endpoint if you set
grant_type=refresh_token. - token_type: This indicates how the JWT token should be attached to subsequent requests to authenticate them. The value “Bearer” means that the value should be used in the HTTP Authorization Header.
- scope: This field is a space-separated list of resources that this token grants access to. The OAuth 2.0 specification allow limited permissions to be granted, which is especially important when granting permissions to 3rd party programs. This is the authorization part of this JWT, it says what you have permission to access.
Using a JWT with Requests
Ok great, we have a request to obtain a JWT and we know what the data inside means, so how do we use it?
In this case, the “token_type” we received was “Bearer”, which means that we should use the “Bearer” schema of the HTTP Authorization header.
Let’s try it out by interacting with the Funnel System.
# Get a new Access Token
$ ACCESS_TOKEN=$(curl -s -X POST https://auth.funnel-labs.io/auth/realms/funnel/protocol/openid-connect/token \
  -d "client_id=service&username=demo&password=abcd1234&grant_type=password" | jq -r '.access_token')

# Use that token in a request via the "Authorization" header.
$ curl -s 'https://api.funnel-labs.io/users/demo/data/funnel/Update?query=coord%20within%201.5%20km%20of%20(52.514,13.350)' \
  -H "Authorization: Bearer $ACCESS_TOKEN"
[{"id": "birds-8", "status": "INACTIVE", "age": 22, "coord": {"latitude": 52.5195, "longitude": 13.3419}},
{"id": "birds-3", "status": "INACTIVE", "age": 43, "coord": {"latitude": 52.5088, "longitude": 13.3419}},
{"id": "birds-7", "status": "INACTIVE", "age": 27, "coord": {"latitude": 52.5118, "longitude": 13.3483}},
{"id": "birds-0", "status": "INACTIVE", "age": 25, "coord": {"latitude": 52.5155, "longitude": 13.3504}}]

# Request accepted, we got data!Code language: PHP (php)
Everything seems to have worked, we obtained a JWT, and used it to run a query on the service!
If you wait too long to use your JWT access token, you may notice an error like this:
$ curl -s 'https://api.funnel-labs.io/users/demo/data/funnel/Update?query=coord%20within%201.5%20km%20of%20(52.514,13.350)' \
  -H "Authorization: Bearer $ACCESS_TOKEN"
The provided JWT is expired.Code language: JavaScript (javascript)
But what if you tamper with the JWT, what will happen then? Let’s try it by adding a letter.
$ curl 'https://api.funnel-labs.io/users/demo/data/funnel/Update?query=coord%20within%201.5%20km%20of%20(52.514,13.350)' \
  -H "Authorization: Bearer a$ACCESS_TOKEN"

The provided JWT has been tampered with and is not valid.Code language: JavaScript (javascript)
I guess that’s what we have validate for!
Validating a JWT using JWKS
Let’s open up our JWT to get an idea of how they are validated. As we saw previously, the algorithm used to validate the signature is in the headers section.
$ echo -n "eyJhbGciOiJSUzI1NiIsInR5cCIgOiAiSldUIiwia2lkIiA6ICJRaW82dDFnWGpsZlFCQ3dYOHpqdHowbGhGRXdXMkl1enMxM2FzUXpRc1ZZIn0" | base64 -d

{
  "alg": "RS256",
  "typ": "JWT",
  "kid": "Qio6t1gXjlfQBCwX8zjtz0lhFEwW2Iuzs13asQzQsVY"
}
Code language: PHP (php)
Ok, so we see that an asymmetric encryption algorithm, RS256, which is based on RSA, is being used. That’s what we expected from a secure system. But there’s something more, what’s this kid field?
In this context, a “key” is a cryptographic key, used for either encoding data or validating signatures. As it turns out, there’s a standard format for describing cryptographic keys in JSON format. That format is JSON Web Key (JWK) and JSON Web Key Set (JWKS), which are described in RFC 7517. This standard format makes it easier for different kinds of systems to use and verify cryptographic keys, for example, to use them to validate a JWT.
In a nutshell, a JSON Web Key Set (JWKS) is just a list of JSON Web Keys (JWK). Each JWK contains information that is specific to a given algorithm, and defines all the parameters and keys needed to apply that algorithm for a purpose, which is either to verify a signature, or to encrypt data.

That kid field that we saw in the JWT header points to a particular JWK in a JWKS, and that JWK will contain the information needed to validate a JWT signature.
Let’s first request the JWKS from this same server using the URL https://auth.funnel-labs.io/auth/realms/funnel/protocol/openid-connect/certs:
$ curl -s https://auth.funnel-labs.io/auth/realms/funnel/protocol/openid-connect/certs | jq

{
  "keys": [
    {
      "kid": "Y2MGSTvMID0dDW5XRPMQ3YQ3y_O6Il69PjhioqYY8_A",
      "kty": "RSA",
      "alg": "RSA-OAEP",
      "use": "enc",
      "n": "yveJEDpMua4Tq8PIMcG7bMGpD5kRNfOv1PEG0QCDTCl33ZGVvvXpPqjD8Zfg1R2GpDEm_1YAKESiJ73uZ_81FKq9UuDVoYS5BYokTWs_aaB9ADlb1IDbSP30jZ5nyWo3rjqmo5Zp-Uan6wNaRB_bVmvnw_nlU7-TYZ-njTbqE6AsADlNxjUPjpwfXW3jcqSeyesySfMEnn3PwTjyHEv7PXpz5RwDTGlP_IYji5CvSjPsB8tPj918QhJyON5gbw-8JVVrJlSMYMVNBfB3FT6eS3G8jI9qyUuMgAi1AAmKpZ06rCMeuHN1xniPnJveXAkg4HeyLws-pAZCxV64OkweMw",
      "e": "AQAB",
      "x5c": [
        "MIICmzCCAYMCBgGBZ7R2PDANBgkqhkiG9w0BAQsFADARMQ8wDQYDVQQDDAZmdW5uZWwwHhcNMjIwNjE1MTQwOTQ4WhcNMzIwNjE1MTQxMTI4WjARMQ8wDQYDVQQDDAZmdW5uZWwwggEiMA0GCSqGSIb3DQEBAQUAA4IBDwAwggEKAoIBAQDK94kQOky5rhOrw8gxwbtswakPmRE186/U8QbRAINMKXfdkZW+9ek+qMPxl+DVHYakMSb/VgAoRKInve5n/zUUqr1S4NWhhLkFiiRNaz9poH0AOVvUgNtI/fSNnmfJajeuOqajlmn5RqfrA1pEH9tWa+fD+eVTv5Nhn6eNNuoToCwAOU3GNQ+OnB9dbeNypJ7J6zJJ8wSefc/BOPIcS/s9enPlHANMaU/8hiOLkK9KM+wHy0+P3XxCEnI43mBvD7wlVWsmVIxgxU0F8HcVPp5LcbyMj2rJS4yACLUACYqlnTqsIx64c3XGeI+cm95cCSDgd7IvCz6kBkLFXrg6TB4zAgMBAAEwDQYJKoZIhvcNAQELBQADggEBALSFbhFzlzxVjoFjcVxpfkIMbD+BJ1gMeIntG4iRf64G06w0LL3EObzmGw9tSRgO5kmbNeALHckVeKvfNdPNYmA2zlrjJdSVKESYeDSzTq5GJ3dKFykW9eG1LgwbyuQKEmYtJsDlwvr3eksXOKnl72CJKOZxZByPGgopnp+vj929zTWdxBndHHE9aflCl51VpX06dJOTKQTiN8N2fdDl644+TkZb1y4RlMIz6L3SXwMjQeb+w9K8xPB+P/3yLnrTnsRU/IAvLUt0400jMZtZUHwQxLSLZZX2W6khOYSsL1bDoMfueUQSFZlOYJm50ReTqFMxfkjtvWW2ejLl0tEgcAw="
      ],
      "x5t": "vdsMrlLZI6l-LuJHq84HVXFrlR8",
      "x5t#S256": "qi5BFs1sby7EtiLoSFfVCPx5LuVQxGbE9Nh-pLMD1iI"
    },
    {
      "kid": "Qio6t1gXjlfQBCwX8zjtz0lhFEwW2Iuzs13asQzQsVY",
      "kty": "RSA",
      "alg": "RS256",
      "use": "sig",
      "n": "xTaRXb5K9MqGvXuCp1gnJn0B8zVg76zK2khd6KZwZNHF--tXX_z0-yNNDaEQI8a5FwZFyabif3CxA-Mb5MTiV5AmRRs4dP45zhErlFt1ci6GmsHQtxPS9yTPtY0n5TYdfhMH_Thxu_nX_MSXcYPapEgsyVe_kJtb5AVY9_RXlvSJFTcl6iipK-IYSwgyiTXMaYu-jiNmtEd404datfpAni0cFIfAXQDZw3Rn0RPoC2tdroltXseS2GlsqfvxWEMS-lUZaXMucyA9K701uGg_WsR4zNBpPBhW3P5TgZ91YJ7_pOWbg8FLGh4FY2oRb4Sm8YNAGPXwCrpcA8dDrEvCEw",
      "e": "AQAB",
      "x5c": [
        "MIICmzCCAYMCBgGBZ7R1gzANBgkqhkiG9w0BAQsFADARMQ8wDQYDVQQDDAZmdW5uZWwwHhcNMjIwNjE1MTQwOTQ4WhcNMzIwNjE1MTQxMTI4WjARMQ8wDQYDVQQDDAZmdW5uZWwwggEiMA0GCSqGSIb3DQEBAQUAA4IBDwAwggEKAoIBAQDFNpFdvkr0yoa9e4KnWCcmfQHzNWDvrMraSF3opnBk0cX761df/PT7I00NoRAjxrkXBkXJpuJ/cLED4xvkxOJXkCZFGzh0/jnOESuUW3VyLoaawdC3E9L3JM+1jSflNh1+Ewf9OHG7+df8xJdxg9qkSCzJV7+Qm1vkBVj39FeW9IkVNyXqKKkr4hhLCDKJNcxpi76OI2a0R3jTh1q1+kCeLRwUh8BdANnDdGfRE+gLa12uiW1ex5LYaWyp+/FYQxL6VRlpcy5zID0rvTW4aD9axHjM0Gk8GFbc/lOBn3Vgnv+k5ZuDwUsaHgVjahFvhKbxg0AY9fAKulwDx0OsS8ITAgMBAAEwDQYJKoZIhvcNAQELBQADggEBAKQUDXOIS8YA3Z8zYpZHruFOfw339h+0X8bYOgx0hyzlyOHbakgVhXl8EM6Ms7MPabxpXLwBsaIiQU7uhiULU+NoQQGItJwsgzYAd0XforaNYKXgp65pHnyAVQDkOiEsQDLETLno+k8SJ1KTa9z0gQReIKf0wVCtxWfSa8xYl7QIvZHQ1VGqyVPdDNbagGEXkNiYquw0mDmAhOBKGw+gh17vm4JsBTdb0vawbuFOulb3c07LueqyDfNzZRLbgWF1Dt/Mq3Ubp+DlQbd2EQMkXZWoYnp82VRJ9vmU6Gl5nZrzPgxNcQQDysAc16WzlvYs1Tp0Esjz2eH5iPM34M+UvwA="
      ],
      "x5t": "0sAciJ1iLbJGRN0eHo-4QxgEkek",
      "x5t#S256": "ECkba-EtCCowEX4tC7Kf_THzq4MtYsrcQ2wVoGBbfgc"
    }
  ]
}Code language: JavaScript (javascript)
Do you see that JWK with kid set to Qio6t1gXjlfQBCwX8zjtz0lhFEwW2Iuzs13asQzQsVY? That’s the one that matches our JWT. The use field can have two main values: “sig” means it is used to verify digital signatures, and “enc” means that it’s used for encryption. The field x5c is giving us the chain of X.509 certificates used to authenticate the server. The fields “n” and “e” are specific to the RSA algorithm.
This is the information that your own Front Proxy will use when it validates a JWT.
Configuring Envoy to Authorize Endpoints with a JWT
So far so good. We have all the pieces needed to start our work:
- A source of JSON Web Tokens (we’ll borrow from Funnel-Labs.io).
- A source JSON Web Key Set used to validate those tokens (also borrowed).
- A skeletal Envoy configuration to get us started.
We’re ready to go.
Visualizing the Setup
Before we dive into the configuration files for Envoy, take a quick moment to visualize the setup that we are creating.

Configuring Envoy
In line with tradition, we’ll start by modifying our Envoy configuration file, envoy-basic.yaml, that we first introduced in part 1 of this series on EnvoyProxy. This basic configuration receives incoming connections on port 8080, and simply forwards them along to https://www.envoyproxy.io. We are going to make some changes so that access through our server is authenticated with a valid JWT.
To do this, we make the following modifications to our envoy-basic.yaml file and save it into a new file, envoy-jwt.yaml. We are using HTTP solely to reduce the complexity of this demonstration, NEVER use JWT over HTTP in production, ALWAYS use HTTPS.
static_resources:
listeners:
# WARNING: Never use JWT over HTTP in production, ALWAYS use HTTPS.
- address: ...
filter_chains:
- filters:
- name: envoy.filters.network.http_connection_manager
typed_config:
"@type": type.googleapis.com/envoy.extensions.filters.network.http_connection_manager.v3.HttpConnectionManager
stat_prefix: ingress_http
route_config:
name: local_route
virtual_hosts:
- name: backend
- "*"
routes:
- match:
prefix: "/"
route:
host_rewrite_literal: www.envoyproxy.io
cluster: service_envoyproxy_io
http_filters:
# The filter that reads the JWT is a the HTTP rather than the TCP level.
# https://www.envoyproxy.io/docs/envoy/latest/configuration/http/http_filters/jwt_authn_filter
- name: envoy.filters.http.JwtAuthentication
typed_config:
"@type": type.googleapis.com/envoy.extensions.filters.http.jwt_authn.v3.JwtAuthentication
providers:
# Each JWT authentication provider has a name to be used in routing rules.
provider_funnel:
# The name of the entity that is providing the JWT.
issuer: https://auth.funnel-labs.io/auth/realms/funnel
# Obtain a JSON Web Key Set from a remove server for JWT validation.
remote_jwks:
http_uri:
uri: https://auth.funnel-labs.io/auth/realms/funnel/protocol/openid-connect/certs
cluster: funnel_auth_cluster
timeout: 1s
cache_duration:
seconds: 300
# Extract the JWT base64 payload and include it in a header.
forward_payload_header: x-jwt-payload
rules:
# No authentication provider is specified, thus, no authentication happens.
- match:
prefix: /docs
# Aside from the /docs URL, require JWT authentication using the provider name.
- match:
prefix: /
requires:
provider_name: provider_funnel
- name: envoy.filters.http.router
typed_config:
"@type": type.googleapis.com/envoy.extensions.filters.http.router.v3.Router
clusters:
# A cluster allowing communication with the Funnel authentication service.
- name: funnel_auth_cluster
type: STRICT_DNS
connect_timeout: 500s
load_assignment:
cluster_name: funnel_auth_cluster
endpoints:
- lb_endpoints:
- endpoint:
address:
socket_address:
address: auth.funnel-labs.io
port_value: 443
transport_socket:
name: envoy.transport_sockets.tls
- name: service_envoyproxy_io
...
Code language: PHP (php)In the configuration file, there are few items of interest to note:
- The JWT Filter is inside the filters contained by the HTTP Connection Manager Filter.
- A cluster, or routing target, must be defined for the server that has the JWKS.
- JWKS format is standardized, so all you need is a URL to get it.
- The JWT configuration is broken into two parts:
- JWT “providers”, which means you can have multiple places to validate JWTs.
- JWT “rules”, which means you can use those JWT providers based on things like URL prefixes, headers, etc.
- By default, JWT providers are not actually used unless you also specify a rule to use them.
- We made a special exception in our rules, to never require JWT for the /docs path.
Trying it Out
Let’s start our envoy sever with our new configuration:
$ envoy -c envoy-jwt.yaml
So far so good. First let’s call the “/docs” path, which we configured to not require a JWT, just to make sure requests are going through.
WARNING: Always use HTTPS with JWT in production, we are using HTTP for demonstration purposes only!
$ curl -D - http://localhost:8080/docs | head -n5

HTTP/1.1 200 OK
...Code language: JavaScript (javascript)
Great, so far so good. Now what if we access another path that requires a JWT?
$ curl -s -D - http://localhost:8080/

HTTP/1.1 401 Unauthorized
content-length: 14
content-type: text/plain
date: Thu, 20 Oct 2022 12:48:14 GMT
server: envoy

Jwt is missingCode language: JavaScript (javascript)
Ok neat, that’s what we expected. So let’s get a valid JWT and try again!
$ ACCESS_TOKEN=$(curl -s -X POST https://auth.funnel-labs.io/auth/realms/funnel/protocol/openid-connect/token \
  -d "client_id=service&username=demo&password=abcd1234&grant_type=password" | jq -r '.access_token')
$ curl -s -D - http://localhost:8080/ \
  -H "Authorization: Bearer $ACCESS_TOKEN" | head -n5

HTTP/1.1 200 OKCode language: JavaScript (javascript)
And if we try to muck around with that JWT?
$ curl -s -D - http://localhost:8080/ \
  -H "Authorization: Bearer ${ACCESS_TOKEN}b"

HTTP/1.1 401 Unauthorized
content-length: 22
content-type: text/plain
date: Thu, 20 Oct 2022 12:47:24 GMT
server: envoy

Jwt verification failsCode language: JavaScript (javascript)
Finally, what if we wait until this JWT expires?
# One coffee break later...
$ curl -s -D - http://localhost:8080/ -H "Authorization: Bearer $ACCESS_TOKEN"
HTTP/1.1 401 Unauthorized
content-length: 14
content-type: text/plain
date: Thu, 20 Oct 2022 13:00:12 GMT
server: envoy

Jwt is expiredCode language: PHP (php)
And that’s it, we have a fully functional Front Proxy that you can use authenticate requests with JWTs.

Service Authorization with JWTs
Once the JWT has been authenticated and validated, what are services supposed to do with it? Because the JWT has a simple format of <base64(header)>.<base64(payload)>.<signature>, services can simply pull out the payload and decode it themselves. Alternatively, the configuration we created put the base64 payload into the HTTP header x-jwt-payload.
For the sake of completion, let’s take a peek inside of our JWT payload.
$ echo -n "$ACCESS_TOKEN" | cut -d'.' -f2 | base64 -d | jq

{
  "exp": 1666271283,
  "iat": 1666270983,
  "jti": "cf25ff9f-1fed-404a-afbc-26d8cf9c6f71",
  "iss": "https://auth.funnel-labs.io/auth/realms/funnel",
  "sub": "20673bd6-2dad-4057-bda1-84cb4fa73fab",
  "typ": "Bearer",
  "azp": "service",
  "session_state": "bee82aff-2f66-4fd3-b85b-391977f6c829",
  "acr": "1",
  "scope": "funnel-spout funnel-mouth",
  "sid": "bee82aff-2f66-4fd3-b85b-391977f6c829",
  "namespaces": [
    "funnel",
    "com.example"
  ],
  "username": "demo"
}Code language: PHP (php)
Some of this data is standard information, such as the fields: exp, iat, iss, sub, typ, etc.
Other fields are actually application specific fields that are for the Funnel Service. For example, the fields “username”, “scope”, and “namespaces” are custom.

A service can use these custom fields to determine if a particular user is authorized to request the given resource or not. E.g. which scope does the resource belong to? Is the user authorized to access that scope?
The service can also compare the owner of a resource to the user ID (typically stored in the “sub” field).
Because the server can be confident that the provided JWT has not been modified (otherwise the Front Proxy would have rejected it), it can assume that the information inside is accurate and can be trusted.
Thus, if your API has an endpoint like, HTTP GET /api/v2/transactions, the identity of whose transactions to retrieve can be inferred from the JWT. Simply read the “sub” field, and then use that as your user ID when querying for transactions.
Conclusions
Making a secure API can be quite challenging, especially when there are multiple services that exist, which may not even be implemented using the same programming language. Using a Front Proxy can solve these common problems in a single place, allowing services to focus primarily on their own business logic.
When combined with HTTPS, JWT tokens can be obtained and managed with little effort. In fact, the majority of the effort is in understanding all the standards and technologies involved: JSON, JWT, JWKS, OAuth 2.0, OpenID Connect, X.509 Certificates, etc. But once these core concepts are understood, one can make use of standardized implementations that already exist, greatly reducing the amount of time needed to get a system up and running, while benefiting from expert level implementations that come with tools like Envoy, KeyCloak, and others.
9 Responses
Hi! It is a very good posts. I learn a lot from it.
Having read your previous posts, I have a question. Is it possible to combine the “EnvoyProxy 3: Sophisticated Rate Limiting” post and “EnvoyProxy 5: Authorized Access with JWT” post to setup a rate limit configuration that different users (having different JWT) will be assigned different rate limits?
According to the “EnvoyProxy 3: Sophisticated Rate Limiting” post, to achieve it, it seems that it is required to add a descriptor map to requests which has key/value that the value should be the value of “sub” field of payload section of the jwt. Is it correct? If correct, how to do that?
Greetings Stanley,
Very insightful observation. Yes, it is indeed possible to take JWT information into account when controlling rate limits.
There’s a few things that must be set up in order to accomplish this. First, you have to tell the `JwtAuthentication` filter to record the JWT data and store it into Dynamic Metadata (data that Envoy stores alongside the request that you can use for processing:
static_resources: listeners: filter_chains: - name: envoy.filters.network.http_connection_manager typed_config: "@type": type.googleapis.com/envoy.extensions.filters.network.http_connection_manager.v3.HttpConnectionManager http_filters: - name: envoy.filters.http.JwtAuthentication typed_config: "@type": type.googleapis.com/envoy.extensions.filters.http.jwt_authn.v3.JwtAuthentication providers: my_provider: # Extract the JWT claims into request dynamic metadata. # The metadata key is defined by the filter: envoy.filters.http.jwt_authn # The metadata path for each claim is., e.g. payload.sub
payload_in_metadata: payload
Once you have done this, this metadata can be referenced and used to add descriptor entries. The following example pulls out the standard “sub” JWT claim as well as a fictional one called “my_key” and provides two descriptors to the rate-limiting service.
static_resources:
  listeners:
    filter_chains:
      - name: envoy.filters.network.http_connection_manager
        typed_config:
          "@type": type.googleapis.com/envoy.extensions.filters.network.http_connection_manager.v3.HttpConnectionManager
          route_config:
            virtual_hosts:
              - name: default
                domains:
                  - "*"
                rate_limits:
                  - actions:
                    - metadata:
                        descriptor_key: my_descriptor_key
                        source: DYNAMIC
                        metadata_key:
                          key: envoy.filters.http.jwt_auth
                          path:
                            - key: payload
                            - key: my_claim
                    - metadata:
                        descriptor_key: sub
                        source: DYNAMIC
                        metadata_key:
                          key: envoy.filters.http.jwt_authn
                          path:
                            - key: payload
                            - key: sub
At this point, one can make use of those descriptors in the rate-limit service, e.g. having a separate rate limit per user (using ‘sub’), and setting that rate limit based on the value of the ‘my_claim’ claim.
Hi Vijay! Thank you very much for your reply!
Hey Vijay,
Thanks for the informative article as always. Since you mentioned refresh token, I was wondering how one could have envoy obtain a new access token using the refresh token? Have read that it should be possible for envoy/other similar gateway API tools to automatically obtain new tokens once the access token nears its expiry time but have yet to seen it done with envoy’s built in features.
Greetings Ted and thanks for the question.
In this case, the front proxy / gateway is not the one responsible for obtaining new access tokens using a refresh token. The reason for this comes from thinking about what the purpose of the JWT is in the first place, which largely revolves around Authorization, i.e. determining if the person who is making the API call is allowed to make it in the first place. You wouldn’t want one user to, for example, try to make a request where they pretend to be another user and try to get access to that data.
If the Front Proxy / Gateway were to automatically gather the access token and refresh token itself, this could allow potentially any user to get access to the system, potentially bypassing even the need to Authenticate, i.e. prove that they really are who they say they are via a password or some other credentials.
But there’s a second problem as well. Even if the Front Proxy were to obtain a refresh token, what would it do with it? It has no place to store it and no way to deliver it to the client, who is ultimately the one who has to make use of it.
While one can manually write client code to use a refresh token to obtain a new access token as the old access token is nearing its expiration date, the most common solution to this problem is to simply use an OAuth2 or OpenID Connect client library to perform this work for you. Depending on the programming language you are working in, here are a few examples:
* Dart: https://pub.dev/packages/oauth2
* JavaScript: https://github.com/panva/oauth4webapi
* Java (Spring Framework): https://github.com/spring-projects/spring-security-samples/tree/main/servlet/spring-boot/java/oauth2/webclient
* D: https://github.com/thaven/oauth
Happy coding!
Appreciate the speedy response Vijay and the reference links. It’s a good point you make about automatically grabbing new tokens undermining the point of JWT. I wonder how Istio and the like are justifying that feature.
As for your second point, I think we can do away with automatically renewing tokens near expiry date and instead renew upon a client request made after tokens expired. At that point, envoy ideally would try to obtain a new access_token using the previous refresh_token rather than redirect to authentication. This way there’s no need for envoy to store anything. However it doesn’t seem like envoy has this feature built in either.
On the second point, it’s crucial to understand that normally refresh tokens are only made available upon calling the Token Endpoint, which is typically done to a completely different server, the Authentication Server. That Authentication Server may not go through your Envoy instance at all, it could be Google, LinkedIn, GitHub, etc. By design, the OAuth2.0 protocol is built around making sure that the computers that provide a service are separated from the systems that perform Authorization.
Thus, it is entirely possible that the Envoy instance never encounters the refresh token at all before it is used.
You are also correct that using refresh tokens is entirely optional, and you can just get a new access token after the old one expires. However, the primary purpose of a refresh token is so that you do not have to ask the user for their password or credentials again. It can be insecure to store a user’s entered password in the client, especially because that can leave it vulnerable to attacks from other programs running on the client’s machine. Using a refresh token avoids the need to store those credentials entirely.
In the case of Istio, at least from my experience, I’ve never encountered a feature where it would keep or automatically apply refresh tokens on behalf of a client. Do you happen to have a link to documentation about that feature?
I haven’t used Istio personally so cannot point to the exact location of the feature, but came across a comment: https://github.com/envoyproxy/envoy/issues/8571 stating that Istio does automatic refresh, supported by Istio’s official blog stating similar (you’ll need to ctrl+f keyword refresh) https://istio.io/latest/blog/2019/app-identity-and-access-adapter/.
Agreed that ideally we get a new access token via refresh token in order to save the client another credential login. So with the system shown in your diagram, how would you implement the refresh mechanism?
Ah, the link you provided is helpful. This person is attempting to implement the OAuth2 client internally as a filter that is deployed in Envoy. I would strongly recommend against doing such a thing, as it negates all the protections for the user that using OAuth2 and JWTs provides in the first place. With the server obtaining and refreshing the JWT token, it basically reduces your protection down to the level of the HTTPS communication, and nothing more. Such an Envoy filter should definitely not be used for external clients running from a browser or a mobile app.
For internal trusted clients, such as back-end services, it’s also unnecessary, because if you are using an OpenID Connect communication to some party requiring a JWT (like for contacting a 3rd party service), it’s better to use a grant=client_secret when getting a token, and use that dedicated OpenID Connect client to have a long duration for the JWT, removing the need to refresh at all. See https://developers.google.com/identity/openid-connect/openid-connect#exchangecode