EnvoyProxy 3: Sophisticated Rate Limiting

Table of Contents
Abstract
This article continues on the work from the previous article, EnvoyProxy 2, but makes use of a powerful feature, rate limiting, which can block requests if they are made more frequently than a certain limit. A demonstration of using this feature to protect against general brute-force attacks is provided, as well as customizing rate limits by URL, method, etc. Finally we dive into a more complex example, adding rate limiting that is unique for each individual caller.
Introduction
This article builds upon the knowledge gained in part 1 and part 2 of this series on the reverse-proxy software EnvoyProxy. In a nutshell, a reverse-proxy sits at the edge of an organization’s computer network, and it receives incoming requests from clients on the Internet. It can perform common network-related logic on those requests such as routing, load-balancing, security, encryption, and the topic of this article: rate limiting.
If one approaches using Envoy by starting with only configuration files in YAML without any context, things can quickly become confusing, and soon after, frustrating. Thus, we will go through a few concepts before we start diving into how to use EnvoyProxy to perform rate limiting.
What is Rate Limiting?
At its heart, rate limiting involves the ability to enforce constraints on the frequency by which requests from clients can be made.
This is not the equivalent to, for example, the speed limit of cars. Neither is rate limiting the equivalent of waiting in line to get into a restaurant. When information is electronically transmitted, the actual speed of the message cannot be modified. The message cannot be asked to wait in line. Furthermore, nothing can be done to actually stop a client from making more requests than the system desires.
By analogy, it is most similar to selling tickets in a movie theater. When all the seats are sold out, customers are told they have to come at another time or see a different movie until there is available space.

The way rate limiting is implemented is that, when the system determines that a rate limit has been exceeded, the reverse-proxy at the edge of the system network will automatically return an error response to the request, without the request ever arriving at the intended computer system.
Typically HTTP Status Code 429 (Too Many Requests) is returned to clients which exceed a rate limit. By doing this, the reverse proxy prevents limited system resources from being expended actually servicing the request.
What is Rate Limiting For?
There can be several reasons to perform rate limiting:
- Protect Against Denial of Service Attacks: A single machine or a fleet of machines on the Internet can purposefully send a large volume of requests to a service provided by your organization with the intent of causing so much load to your system that no other users may use it either. Finding ways to limit how often computers can call your service provides basic protection.
- Protect Against Internal Mistakes: Any software system you have is likely to encounter bugs and mistakes from time to time that need to be corrected. An accidental infinite loop can quickly take down your entire system if it results in a flood of requests to a critical service. Thus, rate limiting can keep request rates within reasonable limits.
- Protect Against Brute Force Attacks: A brute force attack is where an external caller makes a high number of requests in order to eventually guess a user’s password or other secret item of information. Enforced request rate limits can make such attacks infeasible.
- Limit Excess Expenses: Some requests that users make may incur a cost to your organization, for example, requests that result in SMS messages being sent may quickly add up in costs. Limiting how often such services may be called can keep the costs incurred from users within reasonable constraints.
- Implement Service Level Tiers: For some kinds of Internet services, the request rate is actually part of the product itself. For example, a service that performs contact information look-ups for marketing teams may have limits on how many look-ups can be done per day, with more expensive tiers permitting more requests.
Depending on the use-case, rate limiting might be to protect specific API endpoints, to limit requests per unique IP, to limit requests per logged in user (irrespective of how many devices they have), or they may be overall limits on all callers of a service combined.
Naturally, any software system that is going to perform rate limiting needs to be able to do it quickly and efficiently, based on information that is readily available without much additional computation. When looking at OSI Level 4, the Transport Layer, information available in TCP, such as the formation of new connections, ports, and IP addresses are available to use for rate limiting. More advanced rate limiting systems can often look into OSI Level 7, the Application Layer, in order to perform rate limiting based on information available in HTTP, such as the request method, path, and header values.
Using such information, a rate limiting system could try to enforce rules like the following:
- The entire system may not process more than 5,000 requests per second.
- No single IP address may make more than 20 requests per second.
- Total HTTP requests to /login with method POST may not exceed 3 requests per minute.
- Each unique user who logs into the system and has a valid JSON Web Token, and that token indicates that the account is in the “FREE” tier, may not make more than 10 requests per minute.
As you can see, depending on the needs of an organization, the possible logic that needs to be performed can be quite diverse. Often a single organization will need to employ many kinds of rate limits at the same time, and none of them should be exceeded.
How is Rate Limiting Implemented?
Irrespective of the particular combination of software and hardware that is used for rate limiting, there are a few common concepts that come up, which are broken down into two stages:
- Choosing a group/bucket with a rate limit.
- Limiting the request rate.
Choosing a Group/Bucket with a Rate Limit

The first stage of the algorithm is to quickly determine what group/bucket that a request belongs to. By reading the initial bytes of an IP packet, one can quickly find information such as the IP address and the protocol of the message: https://www.rfc-editor.org/rfc/rfc791#section-3.1
    0                   1                   2                   3
    0 1 2 3 4 5 6 7 8 9 0 1 2 3 4 5 6 7 8 9 0 1 2 3 4 5 6 7 8 9 0 1
   +-+-+-+-+-+-+-+-+-+-+-+-+-+-+-+-+-+-+-+-+-+-+-+-+-+-+-+-+-+-+-+-+
   |Version|  IHL  |Type of Service|          Total Length         |
   +-+-+-+-+-+-+-+-+-+-+-+-+-+-+-+-+-+-+-+-+-+-+-+-+-+-+-+-+-+-+-+-+
   |         Identification        |Flags|      Fragment Offset    |
   +-+-+-+-+-+-+-+-+-+-+-+-+-+-+-+-+-+-+-+-+-+-+-+-+-+-+-+-+-+-+-+-+
   |  Time to Live |    Protocol   |         Header Checksum       |
   +-+-+-+-+-+-+-+-+-+-+-+-+-+-+-+-+-+-+-+-+-+-+-+-+-+-+-+-+-+-+-+-+
   |                       Source Address                          |
   +-+-+-+-+-+-+-+-+-+-+-+-+-+-+-+-+-+-+-+-+-+-+-+-+-+-+-+-+-+-+-+-+
   |                    Destination Address                        |
   +-+-+-+-+-+-+-+-+-+-+-+-+-+-+-+-+-+-+-+-+-+-+-+-+-+-+-+-+-+-+-+-+
   |                    Options                    |    Padding    |
   +-+-+-+-+-+-+-+-+-+-+-+-+-+-+-+-+-+-+-+-+-+-+-+-+-+-+-+-+-+-+-+-+
In the example above, at byte 10, one can get the protocol, and see if it’s UDP, TCP, ICMP, or something else.
Using boolean logic, the group/bucket that a message belongs to can quickly be identified, whether that grouping is by source IP address, or even more advanced data, such as the HTTP method or path or headers.
Limiting the Request Rate
Given a given group/bucket, the system may desire a certain rate limit, such as 20 requests per minute. The next step is to actually ensure that limit in an efficient manner. The most common algorithm for enforcing a rate limit is known as the token bucket.
The algorithm is very simple, and it basically consists of the following:
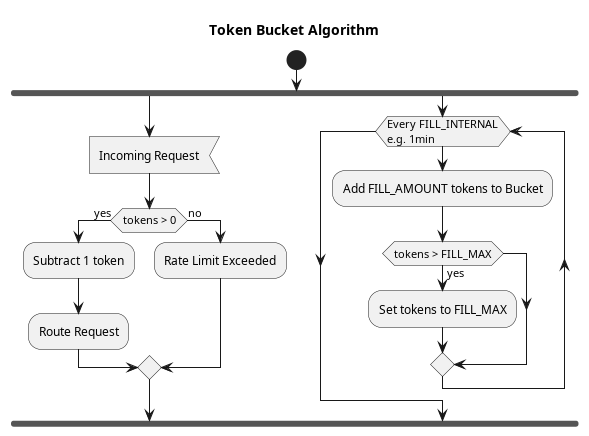
- Every FILL_INTERVAL (e.g. 1 minute), a number of tokens is added to the bucket (e.g. 20), with any tokens beyond the bucket’s capacity spilling out.
- When a request arrives, the count of tokens in the bucket is checked:
- If the token count is > 0, then the request is permitted, and the token count is lowed by 1.
- If the token count is 0, then the request is rejected with an error.
That’s it, it’s very simple.

Rate Limiting with EnvoyProxy
Envoy Rate Limiting Concepts
Thought we were done with context and conceptual explanations? Well guess what, EnvoyProxy also has its own layers of abstractions built on top of all this that must be understood before it can be used.
Previously, we discussed that any system that implements rate-limiting has two problems to solve:
- Choosing a group/bucket to rate limit.
- Limiting the request rate.
Thankfully, EnvoyProxy uses the traditional token bucket algorithm, and the configuration sections that define a token bucket are no big surprise.
{
// The initial amount of tokens in a bucket and its max capacity.
"max_tokens": ...,
// The time interval in which 'tokens_per_fill' are added, e.g. 1min.
"fill_interval": {...}
// The number of tokens to add to the bucket every 'fill_interval'.
"tokens_per_fill": {...},
}Code language: PHP (php)Choosing the group/bucket to rate limit is where EnvoyProxy introduces some complexity. At its heart, a group/bucket is uniquely identified by “descriptors“. What are descriptors? They are an arbitrary key-value map. For example, using JSON syntax, a descriptor map could be: {"authenticated": "true", "path": "/a/b/c", "remote_ip": "10.0.0.1"}.
The configuration files in EnvoyProxy allow token buckets to be defined for each unique descriptor map. For example, {"path": "/a/b/c", "remote_ip": "10.0.0.1"}, {"path": "/a/b/c", "foo": "bar"}, and {"path": "/a/b/d", "remote_ip": "10.0.0.1"} could all be configured to use different token buckets.
Setting Descriptor Maps for Connections
So this idea of a “descriptor map” is all well and good, it’s just a set of keys with values, and we know that a token bucket can be matched to those values. Great. Unfortunately incoming requests do not magically have these descriptor maps set on them when they arrive, a filter must process a request and add that information to the request. There are a few filters that can fill out a descriptor map to a request, but the most commonly used one is the large and multi-purposed HTTP Connection Manager Filter.
At first glance, there doesn’t appear to be anything in the HTTP Connection Manager Filter even remotely related to setting descriptors, a.k.a. the descriptor map. The logic is buried deep inside, where the routing is configured.
When receiving a connection, the HTTP Connection Manager checks for a matching virtual host (by looking at the host in the URL), and then looks for a matching route entry. Each route entry contains a match, which says what paths, methods, headers, etc. are applicable to the route entry, and a route action (confusingly called a “route”), which says what to do with the request if it matched.
We have already seen some kinds of route actions, such as sending the request to a cluster. However, additional rate_limit related actions can be taken as well. These rate-limit actions all do the same thing, they set a key and a value to be added to the message’s descriptor map. Some rate-limit actions, like source_cluster, use a pre-defined key (which in this case has the same name as the rate-limit action, “source_cluster”). Other rate-limit actions allow you to manually specify the key and value, such as the generic_key rate-limit action, allow you to set the key and value to put into the descriptor map yourself.
For example, consider this snippet of an envoy configuration file:
static_resources:
listeners:
- address: ...
filter_chains:
- filters:
- name: envoy.filters.network.http_connection_manager
typed_config:
"@type": type.googleapis.com/envoy.extensions.filters.network.http_connection_manager.v3.HttpConnectionManager
stat_prefix: ingress_http
route_config:
name: local_route
virtual_hosts:
- name: backend
domains: [ "*" ]
routes:
-
# The conditions that a request must satisfy to follow this route.
# https://www.envoyproxy.io/docs/envoy/latest/api-v3/config/route/v3/route_components.proto#envoy-v3-api-msg-config-route-v3-routematch
match:
# A match against the beginning of the :path pseudo-header.
prefix: "/"
# The routing action to take if the request matches the conditions.
# https://www.envoyproxy.io/docs/envoy/latest/api-v3/config/route/v3/route_components.proto#envoy-v3-api-msg-config-route-v3-routeaction
route:
host_rewrite_literal: www.envoyproxy.io
# Route this request to a cluster.
cluster: service_envoyproxy_io
# Perform rate-limit related actions on the request.
rate_limits:
# Various actions to extract and label requests with descriptor keys/values.
# https://www.envoyproxy.io/docs/envoy/latest/api-v3/config/route/v3/route_components.proto#envoy-v3-api-msg-config-route-v3-ratelimit-action
- actions:
# Read a request header and use its value to set the value of a descriptor entry.
# https://www.envoyproxy.io/docs/envoy/latest/api-v3/config/route/v3/route_components.proto#envoy-v3-api-msg-config-route-v3-ratelimit-action-requestheaders
- request_headers:
descriptor_key: path # Key
header_name: ":path" # Value from pseudo-header ":path".
- request_headers:
descriptor_key: method # Key
header_name: ":method" # Value from pseudo-header ":method".
Code language: YAML (yaml)In this example, an HTTP GET request to “/ham/sandwich” would result in the descriptor map for the request having a value of {"path": "/ham/sandwich", "method": "GET"}. When a separate rate-limiter filter is run, it will have access to this descriptor map.
Rate Limit Filters
Now that we have discussed how the HTTP Connection Manager Filter can add a descriptor map to requests, let’s next discus how this information can be used by Rate Limiting Filters in EnvoyProxy. EnvoyProxy has two different ways of configuring rate-limiting which will be discussed separately:
- Local Rate Limiting: Buckets may only be defined for exact descriptor map matches with explicit values or a default. Rate limiting only works for a single EnvoyProxy instance.
- Global Rate Limiting: Buckets may be shared between multiple EnvoyProxy instances. Buckets may be defined to implicitly exist for each unique value for a key in a descriptor map. Requires an external rate-limiting service.
Local Rate Limiting
EnvoyProxy has local rate limiter filters for both L4 connections (using data available in TCP, etc.) as well as L7 connections (using data available in HTTP, etc.). These filters can inspect the descriptor map that has been added to the request previously in the HTTP Connection Manager Filter, and make rate limiting decisions directly inside the EnvoyProxy server.
However, it should be noted that Local Rate Limiting in Envoy has several severe limitations:
- Single Instance Only: The rate limiting token buckets used for local rate limiting live ONLY in that single Envoy instance. If you have multiple Envoy instances cooperating with each other, or to balance request load, they will not be aware of each other.
- Exact Descriptor Map Matches Only: When configuring the Local Rate Limiter filter, it only supports exact matches on descriptor keys/values. If no match is found, then a default token bucket is used. This means it is impossible to dynamically create a separate bucket for each requester IP, for example.
When is it useful to use a Local Rate Limiter Filter? It can be useful for implementing generic rules that don’t need much context, such as putting upper limits on request rates in order to limit the costs associated with denial of service attacks. Even so, Local Rate Limiters lack the ability to have rate limits per unique caller, thus, the denial of service attack would still succeed in stopping other users from using your service normally.
The limitations of Local Rate Limiter Filters are quite extreme, and they are not suitable for most practical purposes. This article will not spend further time discussing their configuration, but a working and fully documented example can be found in envoy-localratelimit.yaml.
Global Rate Limiting
Most practical use cases for rate limiting require the ability to ensure organization-wide limits that are coordinated between multiple instances of EnvoyProxy, or they require the ability to create limits specific to each requestor dynamically. For example, no single IP may call your services more than 20 times per second, and you should not have to explicitly define a bucket in your configuration file for every single possible IP address.
In order for EnvoyProxy to support such use cases, Global Rate Limiting must be used. Unfortunately, there is more to Global Rate Limiting than simply using a different configuration format. EnvoyProxy lacks the ability to store dynamic rate-limiting information for token buckets itself, and it can only work in cooperation with a separate piece of software that implements EnvoyProxy’s Rate Limiting Service Interface.
Luckily one does not have to drop everything and create a new service before moving on. There is a reference Ratelimit Service implemented using Go and Redis.

Assuming that we have a Ratelimit Service running on port 9000 (HTTP interface) and 9001 (gRPC interface), we still need to configure Envoy to communicate with it.
We will start from the basic envoy configuration in part 1, envoy-basic.yaml. We need to add a filter to actually consult with the Ratelimit Service, and this filter is called extensions.filters.http.ratelimit.v3.RateLimit. From the name, you will notice that this is an HTTP-specific filter, so we need to add it to the list of filters within the HTTP Connection Manager Filter This is the filter that takes binary data and converts it into an HTTP message for other filters to do further processing.
Let us first add this filter to our configuration:
static_resources:
  listeners:
    - address:
        socket_address:
          address: 0.0.0.0
          port_value: 8080
      filter_chains:
        - filters:
          - name: envoy.filters.network.http_connection_manager
            typed_config:
              "@type": type.googleapis.com/envoy.extensions.filters.network.http_connection_manager.v3.HttpConnectionManager
              ...
              http_filters:
                # The ratelimit filter checks with the Routelimit Service to perform global route limiting.
                # https://www.envoyproxy.io/docs/envoy/latest/api-v3/extensions/filters/http/ratelimit/v3/rate_limit.proto#envoy-v3-api-msg-extensions-filters-http-ratelimit-v3-ratelimit
                - name: envoy.filters.http.ratelimit
                  typed_config:
                    "@type": type.googleapis.com/envoy.extensions.filters.http.ratelimit.v3.RateLimit
                    # The domain makes a unique namespace when matching against descriptors.
                    domain: app
                    # Limit the rate filter to internal, external, or both types of requests.
                    # Internal requests are identified by the header 'x-envoy-internal: true'.
                    request_type: external
                    # What is this?
                    stage: 0
                    # Apparently Ratelimit Services can return RESOURCE_EXHAUSTED instead of UNAVAILABLE.
                    rate_limited_as_resource_exhausted: true
                    # Indicate whether a failure in the ratelimit service should result in requests being denied.
                    failure_mode_deny: false
                    # Format ratelimit headers using the IETF draft format:
                    # https://datatracker.ietf.org/doc/id/draft-polli-ratelimit-headers-03.html
                    enable_x_ratelimit_headers: DRAFT_VERSION_03
                    # Specify where to find the ratelimit service.
                    rate_limit_service:
                      # The location of the Ratelimit Service must be defined as a cluster.
                      grpc_service:
                        envoy_grpc:
                          cluster_name: ratelimit_service
                      # The version factors into the endpoint for contacting the Ratelimit Service
                      transport_api_version: V3
  clusters: ...
Code language: PHP (php)
At the very end of this filter configuration, you will notice that the actual location of the Ratelimit Service is specified as a cluster named ratelimit_service. We must add that cluster as well to our list of clusters (network targets).
static_resources:
  listeners:
    - address: ...
      filter_chains: ...
  clusters:
    - name: ratelimit_service
      type: STRICT_DNS
      connect_timeout: 1s
      lb_policy: ROUND_ROBIN
      protocol_selection: USE_CONFIGURED_PROTOCOL
      http2_protocol_options: {}
      load_assignment:
        cluster_name: ratelimit_service
        endpoints:
          - lb_endpoints:
            - endpoint:
                address:
                  socket_address:
                    address: 127.0.0.1
                    port_value: 9001
    - ...

Code language: CSS (css)
Putting it All Together
While there are many ways of setting up these software services, we are going to take the approach of having the services run directly on your computer in a terminal. While it is certainly possible to run these services in docker, it can make diagnosing any problems or misconfigurations very difficult. Once the reader is familiar with the services, their command-line options, and their environment variables, creating a docker image for use in your own deployment, whether it be in Kubernetes, AWS ECS, or even bare-metal is a much easier thing to do.
The setup to be created will like like the following:
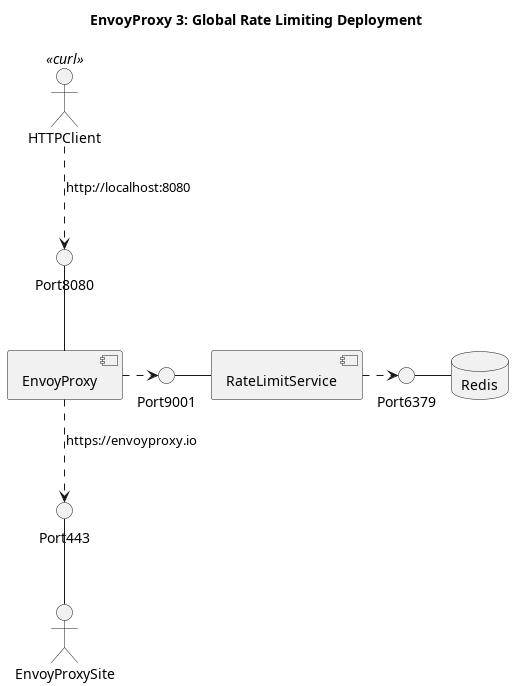
We will use EnvoyProxy in a manner similar to part 1, and it will forward requests that we make on port 8080 to the website https://www.envoyproxy.io. The thing that is special, however, is that the requests must first pass the rules we set in our EnvoyProxy and Ratelimit Service, otherwise they will be rejected.
We will start the necessary pieces in the following order:
- Setup the Redis Server
- Setup the Ratelimit Service
- Setup EnvoyProxy
Setup the Redis Server
If you aren’t already familiar with Redis, it is an open-source, in-memory, data store used as a key-value database, a cache, or message broker.
First install Redis. For example, in Ubuntu Linux, this can simply be done using the command:
$ apt install redis
Open a new terminal and start a Redis server, listening on port 6379 (the default port).
$ redis-server --port 6379
This first step, at least, is relatively straight forward.
Setup the Ratelimit Service

There are many ways to set up the Ratelimit Service, and we will continue to have it run in a terminal, like the other services. In all cases, the current documentation will always be the authoritative reference in case something changes, and to find alternate methods of setup (including running from docker).
The Ratelimit Service is written in Go, thus we need to install the Go compiler. Once finished, validate your installation with the command:
Code language: Bash (bash)$ go version go version go1.19.2 linux/amd64
Next, use the git command to clone the source of the Ratelimit Service.
$ git clone git@github.com:envoyproxy/ratelimit.gitCode language: Bash (bash)Additional information can be found in the file README.md.
Compile and link the Ratelimit service:
$ cd ratelimit
$ make bootstrap
  ...
$ make compile
  ...
$ make tests
  ...Code language: Bash (bash)
At this point, the compiled executable should reside in bin/ratelimit or bin/ratelimit.exe.
If all is working, it should be able to start the Ratelimit Service with the following command:
$ USE_STATSD=false LOG_LEVEL=debug REDIS_SOCKET_TYPE=tcp \
  REDIS_URL=localhost:6379 PORT=9000 GRPC_PORT=9001 bin/ratelimitCode language: JavaScript (javascript)
You will notice that most of the Ratelimit Service configuration is done via environment variables, which has the advantage of being easier to configure in a docker container or a cloud deployment, but has the disadvantage of being nearly undocumented and hard for users to decipher. In this case, the HTTP port used is 9000 and the port used by Envoy via the gRPC protocol is 9001.
We still have not yet configured the Ratelimit Service to have specific token buckets based on the descriptor map for a request, to do that, we need to create a configuration file for the Ratelimit Service. The configuration format is not intuitive, but simple once you recognize the pattern.
Here is an example configuration file what we will use and save into examples/ratelimit/config/part3.yaml:
domain: app
descriptors:
  - key: key1
    value: value1
    rate_limit:
      requests_per_unit: 1
      unit: minute
  - key: key2
    value: value2
    descriptors:
      - key: key3
        value: value3
        rate_limit:
          requests_per_unit: 3
          unit: minute
      - key: key4
        # No value is set, meaning each value gets its own bucket.
        rate_limit:
          requests_per_unit: 4
          unit: minuteCode language: YAML (yaml)
The format allows the user to define a nested set of descriptor keys and values to match upon. If you recall from the start of this article, a descriptor map is fairly arbitrary. It could have 1, 2, or even more keys and values inside of it. Rate limiting can be configured to depend on just a single key being present, or desire multiple keys being present.
In the example above, it means:
- If the request descriptor map has a key of “key1” with value “value1”, limit the request rate to 1 per minute.
- If the request descriptor map has a key of “key2” with value “value2” AND a key of “key3” with value “value3”, limit the request rate to 3 per minute.
- If the request descriptor map has a key of “key2” with value “value2” AND a key of “key4” with any value, limit the request rate to 4 per minute, for each unique value of “key4”.
In a nutshell, there is a list of keys, optional values, and an optional nested list of the same structure. Nesting values means that they are logically combined with “AND”. Listing values means that they all are applied, but share the same parents, which are “AND’ed” with each entry.
To get the Ratelimit Service to read this configuration file, we need to provide two environment variables:
- RUNTIME_ROOT: The base directory to monitor for file changes.
- RUNTIME_SUBDIRECTORY: The subdirectory inside the root directory which contains files for Ratelimit Service. Ratelimit configuration files will be searched for within the
/configsubdirectory of the RUNTIME_SUBDIRECTORY. - RUNTIME_WATCH_ROOT: Whether changes in the root directory should be tracked and trigger reloading of configurations.
Thus, because our configuration file is stored in examples/ratelimit/config/part3.yaml, we need to set these environment variables as follows when we start the server:
$ USE_STATSD=false LOG_LEVEL=debug REDIS_SOCKET_TYPE=tcp \
  REDIS_URL=localhost:6379 PORT=9000 GRPC_PORT=9001 \
  RUNTIME_ROOT=examples RUNTIME_SUBDIRECTORY=ratelimit \
  bin/ratelimitCode language: Bash (bash)
Setup EnvoyProxy

Just like we described at the start, we need to modify the filters in EnvoyProxy to populate the descriptor map, so that it can be given to the Ratelimit Service.
Download the example configuration for EnvoyProxy: envoy-global-ratelimit.yaml
This configuration contains route actions that allow us to populate a descriptor that allows us to test our Ratelimit Service configuration, which expects descriptor entry keys like key1, key2, key3, and key4. To keep things simple, we will populate these descriptor keys using HTTP Headers with the same name.
static_resources:
  listeners:
    - address: ...
      filter_chains:
        - filters:
          - name: envoy.filters.network.http_connection_manager
            typed_config:
              "@type": type.googleapis.com/envoy.extensions.filters.network.http_connection_manager.v3.HttpConnectionManager
              stat_prefix: ingress_http
              route_config:
                name: local_route
                virtual_hosts:
                  - name: app
                    domains:
                      - "*"
                    routes:
                      - match:
                          prefix: "/"
                        route:
                          host_rewrite_literal: www.envoyproxy.io
                          cluster: service_envoyproxy_io
                          rate_limits:
                            - actions:
                                # Read a request header and use its value to set the value of a descriptor entry.
                                # https://www.envoyproxy.io/docs/envoy/latest/api-v3/config/route/v3/route_components.proto#envoy-v3-api-msg-config-route-v3-ratelimit-action-requestheaders
                                - request_headers:
                                    descriptor_key: key1
                                    # The header whose value should used as the descriptor map entry value.
                                    header_name: key1
                                    # Leave the header out of the descriptor if missing.
                                    # By default, rate limiting is skipped if a header is missing.
                                    skip_if_absent: true
                                - request_headers:
                                    descriptor_key: key2
                                    header_name: key2
                                    skip_if_absent: true
                                - request_headers:
                                    descriptor_key: key3
                                    header_name: key3
                                    skip_if_absent: true
                                - request_headers:
                                    descriptor_key: key4
                                    header_name: key4
                                    skip_if_absent: true
              http_filters:
                - name: envoy.filters.http.ratelimit
                  typed_config:
                    "@type": type.googleapis.com/envoy.extensions.filters.http.ratelimit.v3.RateLimit
                    ...
  clusters: ...
Code language: YAML (yaml)
With this configuration in place, we simply start EnvoyProxy like normal using its configuration file:
Code language: Bash (bash)$ envoy -c envoy-global-ratelimit.yaml -l debug
The setup is now complete, and we can begin testing.
Testing Rate Limiting

Ok great, we’re finally ready to actually try all this out. Let’s remind ourselves about the expected rate-limit rules we placed earlier, and try them out.
Testing a Single Descriptor Entry Key
Given our settings in the Ratelimit Service, we expect only 1 request per minute to be allowed when the header key1 has a value of value1, and if the value is different, it is unspecified (be default, unlimited).
  - key: key1
    value: value1
    rate_limit:
      requests_per_unit: 1
      unit: minuteCode language: YAML (yaml)
Let’s run 2 requests in a row, we expect the second request to get rate limited:
$ i=0 ; while [[ $i -lt 2 ]] ; do
    # Only keep the response header, ignore the body.
    curl -s -o /dev/null -D - -H "key1: value1" "http://localhost:8080"
    i=$(( $i + 1 ))
  doneCode language: Bash (bash)
As expected, we see that the first request is allowed, but the second is rejected:
HTTP/1.1 200 OK
age: 0
cache-control: public, max-age=0, must-revalidate
content-security-policy: frame-ancestors 'self';
content-type: text/html; charset=UTF-8
date: Mon, 10 Oct 2022 10:14:17 GMT
etag: "29585cd5bd4813665874a51432696151-ssl"
server: envoy
strict-transport-security: max-age=31536000
x-nf-request-id: 01GF0P6P5R5P2QNB0MWXATZW84
x-envoy-upstream-service-time: 277
x-ratelimit-limit: 1, 1;w=60
x-ratelimit-remaining: 0
x-ratelimit-reset: 44
transfer-encoding: chunked

HTTP/1.1 429 Too Many Requests
x-envoy-ratelimited: true
x-ratelimit-limit: 1, 1;w=60
x-ratelimit-remaining: 0
x-ratelimit-reset: 43
date: Mon, 10 Oct 2022 10:14:16 GMT
server: envoy
content-length: 0Code language: HTTP (http)
What if we use a different value for our header? We expect rate limiting to not be applied, but let’s see:
$ i=0 ; while [[ $i -lt 2 ]] ; do
    curl -s -o /dev/null -D - -H "key1: value2" "http://localhost:8080"
    i=$(( $i + 1 ))
  done

HTTP/1.1 200 OK

HTTP/1.1 200 OKCode language: Bash (bash)
Great!
Testing Descriptor Entries with Unspecified Values
This is finally the big feature that we were looking for at the start, the ability to have a unique bucket for every unique value. This can be a separate rate limit per IP address, per User ID, per HTTP path, or any other value that strikes our imagination.
We can test this ability using the headers “key2” and “key4” from our Ratelimit Service configuration:
  - key: key2
    value: value2
    descriptors:
      - key: key4
        # No value is set, meaning each value gets its own bucket.
        rate_limit:
          requests_per_unit: 4
          unit: minuteCode language: YAML (yaml)
Let’s try it out. We will send 5 requests, we expect the first 4 to get through, and the 5th to be rate limited.
$ i=0 ; while [[ $i -lt 5 ]] ; do
    curl -s -o /dev/null -D - -H "key2: value2" -H "key4: value4" "http://localhost:8080"
    i=$(( $i + 1 ))
  done

HTTP/1.1 200 OK

HTTP/1.1 200 OK

HTTP/1.1 200 OK

HTTP/1.1 200 OK

HTTP/1.1 429 Too Many Requests
Code language: Bash (bash)
And now let’s try it with a different value, “value5”.
$ i=0 ; while [[ $i -lt 5 ]] ; do
    curl -s -o /dev/null -D - -H "key2: value2" -H "key4: value5" "http://localhost:8080"
    i=$(( $i + 1 ))
  done

HTTP/1.1 200 OK

HTTP/1.1 200 OK

HTTP/1.1 200 OK

HTTP/1.1 200 OK

HTTP/1.1 429 Too Many RequestsCode language: Bash (bash)
And it works too, each unique value for key4 has its own rate-limiting token bucket!

Concluding Remarks
The use of EnvoyProxy to perform rate limiting is, as you have found out through first-hand experience, extremely complicated to set up. Much of the complexity comes from the fact that Envoy separate the rate-limiting into two phases: adding descriptor entries to a request, and evaluating those descriptors to perform rate limiting. Further complexity comes from the fact that the rate limiting itself must be provided by an external service, which comes with its own dependencies in the form of Redis and the Go programming language.
However, the capability to perform global rate limiting as part of your network infrastructure is extremely useful. It can be used to implement service tiers, to prevent denial of service attacks, and even provide limited protection against distributed denial of service attacks (so long as the rate limits are set reasonably). Solving such hard problems in a scalable way can make such pain worth it.
If you are working on a similar problem in your own company, then all that remains is to containerize these services and provide configuration values and files appropriate for your environment. The Ratelimiter Service docker-compose-example.yaml is a great place to start.
2 Responses
After the go installation and git download, the make compile and make tests commands are not working.
Sorry for the late response, there’s a surprising amount of spam to moderate even on a simple page like this one.
The RateLimit service (written in Go) is actually implemented by Google. The build chain involves a lot of dependencies on your system as well. The most likely error is that one of these dependencies is missing.
What error message did you get when you attempted to build the `ratelimit` service?