EnvoyProxy 2: Microservices and Routing

Table of Contents
- Abstract
- Introduction
- Microservice Network Topology
- A Simple HTTP Server
- Configure EnvoyProxy to Route on URL Path
- Request Routing Demonstration
- Modifying URLs During Routing
- Conclusion
Abstract
In part 1 of this series of articles on EnvoyProxy, a high level overview of reverse proxies, what they are for, and the internal architecture of EnvoyProxy is explained. Furthermore, the reader was made familiar with how to configure EnvoyProxy and where to find documentation to learn more. In this article, the ways in which EnvoyProxy can be deployed as both a front-proxy as well as an application-sidecar are discussed, and a working example of routing traffic from the front-proxy to individual applications will be demonstrated.
Introduction
In part 1, we discussed the internals of EnvoyProxy and how it can receive network messages via listeners, execute a number of filters on those messages, and eventually route a message to a cluster.

We also outlined a basic configuration file that routed incoming requests to the EnvoyProxy website, which you can view in envoy-basic.yaml. Once you have installed EnvoyProxy, you can start it using the command:
$ envoy -c envoy-basic.yaml
This configuration starts a local server at http://localhost:8000 which forwards requests it receives to https://envoyproxy.io.
However, we would like to do more than simply run EnvoyProxy, we want to do something useful with it! In this article, we will discuss how to use EnvoyProxy as a “front proxy”, that is, a reverse proxy that sits at the edge of your company network, which directs traffic to other servers within your company network.
Microservice Network Topology
Companies that are either large or are rapidly evolving new capabilities often opt to architect their system via microservices. In brief, rather than delivering their service to their users as a single large application server, a number of smaller and more specialized services are created that interact with either the user or other services.
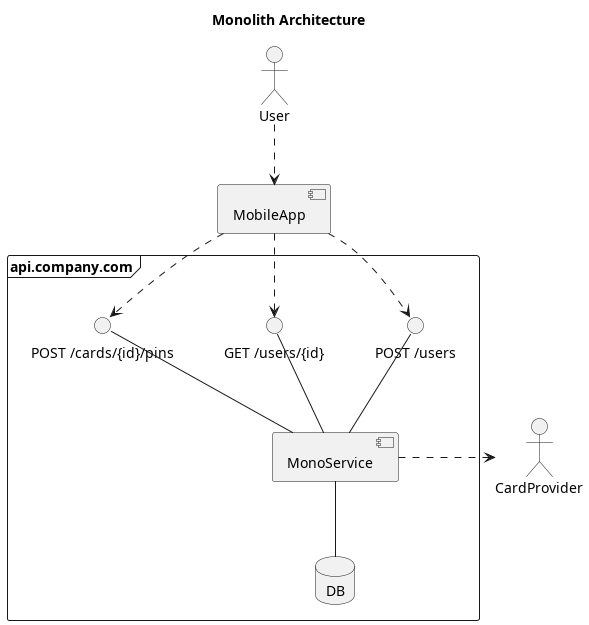
If a company has a simple monolithic architecture, such as that shown in Image 2, virtually all functionality can be stuffed into the single large monolithic service of the company. In this example, there are three API endpoints for users to interact with, and all of them are implemented in a single service which uses a single database. There is little need for routing or any complex network logic in this approach. However, it does come with numerous problems, such as difficulties scaling horizontally, performance problems, cluttered code with complex inter-dependencies, and difficulties when multiple teams are working on different parts of the project at the same time.
One could make the code easier to organize and make development easier by splitting apart this single service into several services that each have a specialized functionality. While such an architecture would help organizing code and deployment, especially on the back-end, it also throws away some of the benefits that we had with the monolith architecture, namely, a unified interface for the front-end.
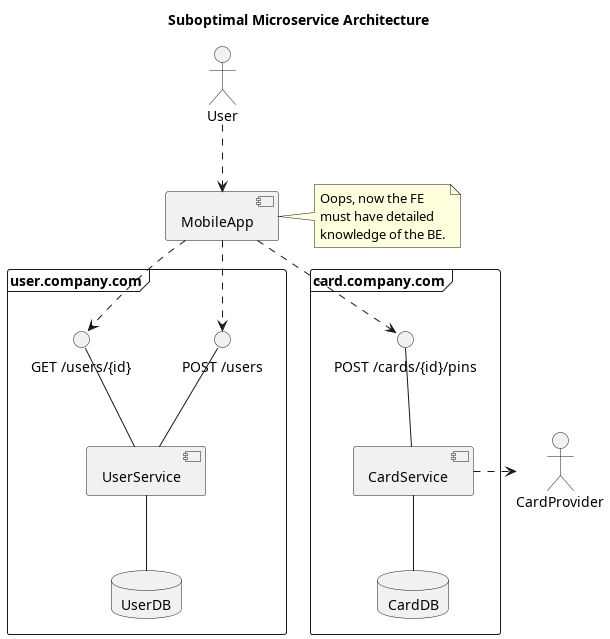
This suboptimal approach has quite a few limitations. Whenever a change is made in the back-end, such as splitting a larger service into two smaller services, changes in the front-end are required because the URL to reach these services will change as well. For example, some day card.company.com could become creditcard.company.com and debitcard.company.com.
It would be better if we could keep the simple unified external interface associated with the monolithic architecture but still be able to split our code into specialized services. This is where a reverse proxy suddenly becomes handy. The same thing could be accomplished using an HTTP-aware load balancer like AWS ELB, but we will be adding more functionality in later articles that load balancers cannot.
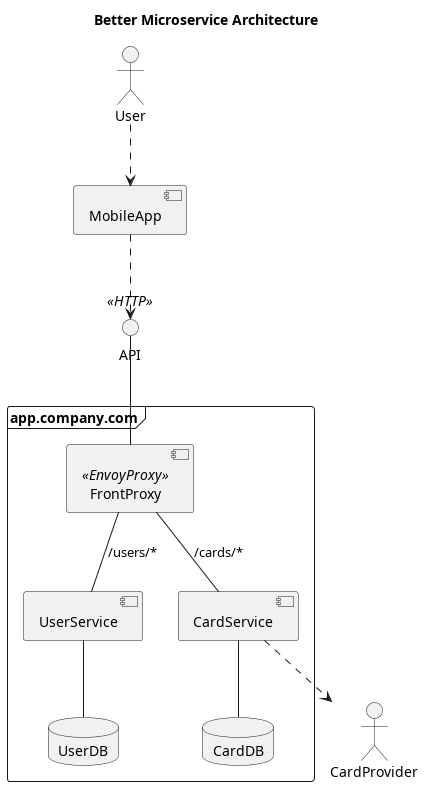
In this slightly improved architecture, we have a single unified HTTP interface at app.company.com and we also have the ability to separate our incoming traffic to individual specialized services on the back-end. This is done by taking advantage of the ability of the reverse proxy to perform routing. In this example, we are using a URL prefix to decide which service to route to, e.g. a request to http://api.company.com/users/{id} is routed to the User Service, and a request to http://api.company.com/cards is routed to the Card Service.
Granted, there is still much to do in creating a good microservice architecture, but we will only introduce a few new capabilities at a time for educational purposes. Next we will demonstrate how to configure EnvoyProxy to perform routing for such an architecture.
A Simple HTTP Server
If we are going to construct a demonstration of using EnvoyProxy to route HTTP requests to different services, then we need some services to route to. Rather than bringing in new technologies and dependencies, let’s see if we can simply make due with shell commands already installed on any Linux/Unix/macOS system. Windows users can get access to standard Unix commands using Cygwin.
Creating an HTTP server can be absurdly simple, because the HTTP specification requires so little.
       Response      = Status-Line               ; Section 6.1
                       *(( general-header        ; Section 4.5
                        | response-header        ; Section 6.2
                        | entity-header ) CRLF)  ; Section 7.1
                       CRLF
                       [ message-body ]          ; Section 7.2
       Status-Line = HTTP-Version SP Status-Code SP Reason-Phrase CRLF
In this case, CRLF refers to the ASCII characters carriage-return and line-feed. Ending a line with two characters, carriage-return followed by line-feed is the newline representation standard in DOS and Windows. This means that the minimal HTTP response can be something as simple as:
HTTP/1.1 200 OK

Code language: HTTP (http)
We’ll go one step up by including some HTML output in our response, so we can at least see it in a browser.
HTTP/1.1 200 OK
Content-Length: 48

<html><body><h1>Server Hello!</h1></body></html>Code language: HTML, XML (xml)
How do we do this? Why, there’s a built-in Unix tool to listen on a network socket and provide an answer when someone connects. We will use the tool nc, a.k.a. netcat. Thus, we can make ourselves a small script to start a server on a port we chose like so:
#!/bin/bash
# File: http-server.sh

# The service name to display in output. (default: Foo)
name=${1:Foo}
# The port to bind to. (default: 8090)
port=${2:-8090}
body="<html><body><h1>$name Service</h1></body></html>"
response="HTTP/1.1 200 OK
Content-Length: ${#body}

$body"

while true ; do
  echo -ne "$response" | nc -C -l $port
doneCode language: PHP (php)
What does this script do? Save it to a file and run it with a command like:
$ bash http-server.sh User 8090
It won’t look like it’s doing much, but if you browse to http://localhost:8090 you should see a page that says “Server Hello!”. You can also call your server from another terminal using the curl or wget command:
$ curl http://localhost:8090
<html><body><h1>User Service</h1></body></html>

$ wget -q -O - http://localhost:8090
<html><body><h1>User Service</h1></body></html>Code language: JavaScript (javascript)
What does it do? It runs in a loop, and runs netcat, listening on the port of your choice (8090 by default). Netcat is run with the options: -l = listen for incoming connections, -C = convert newlines in the input into CR LF. We provide a page to display to netcat using the lowly echo tool with the options: -e = allow escape characters like \n, -n = do not automatically add a newline at the end of the output.
That’s it, now we have a little script we can use to fire up some HTTP Servers that we can route to!
To get us started, use two different terminals to set up a server at ports 8090 and 8091. These will represent two different services, like the User Service and the Card Service in the examples above. We’ll call them later, so leave them running.
# Terminal 1
$ bash http-server.sh User 8090

# Terminal 2
$ bash http-server.sh Card 8091Code language: PHP (php)
Configure EnvoyProxy to Route on URL Path
We’re going to start with what we had in part 1 and the envoy configuration envoy-basic.yaml, copy that file, and start working on envoy-front-proxy.yaml.

Add Service Clusters
We’ll begin by adding two entries to the clusters section of the configuration file, which will send traffic to our two servers running on ports 8090 and 8091.
Our configuration file now has the following contents changed:
static_resources:
listeners:
...
# Configurations for logically similar upstream hosts, called clusters, that Envoy connects to.
# https://www.envoyproxy.io/docs/envoy/latest/api-v3/config/cluster/v3/cluster.proto#envoy-v3-api-msg-config-cluster-v3-cluster
clusters:
- name: user_service
# The type "STRICT_DNS" will load balance between all IPs in the DNS response.
type: STRICT_DNS
connect_timeout: 500s
# nc only accepts 1 message, do not keep the connection alive.
max_requests_per_connection: 1
load_assignment:
cluster_name: user_service
endpoints:
- lb_endpoints:
- endpoint:
address:
socket_address:
address: 127.0.0.1
port_value: 8090
- name: card_service
type: STRICT_DNS
connect_timeout: 500s
max_requests_per_connection: 1
load_assignment:
cluster_name: card_service
endpoints:
- lb_endpoints:
- endpoint:
address:
socket_address:
address: 127.0.0.1
port_value: 8091
Code language: PHP (php)⚠ Hint: When writing configuration files and referencing services running on the same host or virtual host, avoid using the host-name localhost. Why? The host-name localhost can be resolved in IPv4 as 127.0.0.1 or in IPv6 ::1, and this may be different on each host, resulting in errors if server programs do not align with client programs.
For the most part, adding a new cluster is relatively simple. There are only a few change compared to the configuration produced in part 1.
- The cluster type
STRICT_DNSis used. This cluster type will perform a DNS lookup on the given endpoints, and include every IP address found as an endpoint to load balance traffic to. - The cluster
max_requests_per_connectionis set to 1. This is done only because our simple netcat server is completely unaware of request contents, and will only return 1 response per connection. This setting can be removed if you have real services to route to. - The address at
clusters[].load_assignment.endpoints[].lb_endpoints[].address.socket_address.addressdoes not have to be a simple IP address. You can also use a DNS name that is resolvable from the host, e.g. a Kubernetes Service name like “user.svs.cluster.local” or an AWS ECS CloudMap name like “user.local”.
Add Service Routes
So far so good, we now have defined clusters that represent route-able targets that we can send messages to. Next, let us add some routing rules to the ever-important HTTP Connection Manager Filter.
Now let us modify the settings of our filter with the following changes:
static_resources:
  listeners:
    - address:
        socket_address:
          address: 0.0.0.0
          port_value: 8080
      filter_chains:
        - filters:
          - name: envoy.filters.network.http_connection_manager
            typed_config:
              "@type": type.googleapis.com/envoy.extensions.filters.network.http_connection_manager.v3.HttpConnectionManager
              stat_prefix: ingress_http
              route_config:
                name: api
                virtual_hosts:
                  - name: backend
                    domains:
                      - "*"
                    # A list of routes to match against requests, the first one that matches will be used.
                    # https://www.envoyproxy.io/docs/envoy/latest/api-v3/config/route/v3/route_components.proto#envoy-v3-api-msg-config-route-v3-route
                    routes:
                      # The conditions that a request must satisfy to follow this route.
                      # https://www.envoyproxy.io/docs/envoy/latest/api-v3/config/route/v3/route_components.proto#envoy-v3-api-msg-config-route-v3-routematch
                      - match:
                          # A match against the beginning of the :path pseudo-header.
                          prefix: "/users"
                        # The routing action to take if the request matches the conditions.
                        # https://www.envoyproxy.io/docs/envoy/latest/api-v3/config/route/v3/route_components.proto#envoy-v3-api-msg-config-route-v3-routeaction
                        route:
                          cluster: user_service
                      - match:
                          prefix: "/cards"
                        route:
                          cluster: card_service
              http_filters:
                - name: envoy.filters.http.router
                  typed_config:
                    "@type": type.googleapis.com/envoy.extensions.filters.http.router.v3.Router
  clusters:
    ...
Code language: PHP (php)
While we previously routed all traffic to a single destination (forwarding it to www.envoyproxy.io), now we route our traffic depending on the URL path prefix. For example, requests like GET /users or POST /users/123 will now get routed to the user_service cluster, which we previously configured to be at 127.0.0.1:8090. Likewise, requests like GET /cards or POST /cards/pins will now be routed to the card_service cluster, which we previously configured to be at 127.0.0.1:8091.
The EnvoyProxy documentation on the route setting for the HTTP Connection Manager Filter contains a large number of additional options that can be used for routing. For example, routing can be based on: an absolute path, a path prefix, a path regular expression, header values, query parameter values, or the request method.
Request Routing Demonstration
Your EnvoyProxy configuration file should now look like the one here at envoy-front-proxy.yaml.
Remember to start your fake services in separate terminals if those are no longer open.
# Terminal 1
$ bash http-server.sh User 8090

# Terminal 2
$ bash http-server.sh Card 8091Code language: Bash (bash)
Just to make sure they are running, send a simple request or two.
$ curl http://127.0.0.1:8090
<html><body><h1>User Service</h1></body></html>

$ curl http://127.0.0.1:8091
<html><body><h1>Card Service</h1></body></html>Code language: JavaScript (javascript)
Start EnvoyProxy using our new configuration in envoy-front-proxy.yaml.
# Terminal 3
$ envoy -c envoy-front-proxy.yaml

# Alternatively, if you want more debug output.
$ envoy -c envoy-front-proxy.yaml -l debugCode language: PHP (php)
Envoy is now running and listening on port 8080. And now the moment of truth, let’s start sending some requests and see if they get routed where they are supposed to!
$ curl http://localhost:8080/users/1234
<html><body><h1>User Service</h1></body></html>

$ curl http://localhost:8080/cards
<html><body><h1>Card Service</h1></body></html>Code language: JavaScript (javascript)
So far so good! We have the ability to send requests to a single API endpoint, and have those requests get routed to different services upstream.
Modifying URLs During Routing
If we look at the terminals for our User Service and our Card Service, you’ll notice something:
GET /users/1234 HTTP/1.1
host: localhost:8080
user-agent: curl/7.68.0
accept: */*
x-forwarded-proto: http
x-request-id: 722c174b-e442-492f-b1a6-f87536d8a359
x-envoy-expected-rq-timeout-ms: 15000
Code language: HTTP (http)
The path of the request is exactly as it was passed to EnvoyProxy, i.e. envoy received a request to /users/1234 and it was forwarded to our service in exactly that form. For most use cases, this is perfectly fine and exactly what is desired.
However, for the sake of completion, let’s presume that we do not want the User Service to receive the URL exactly as it arrived, but rather, we want to leave out the parts of the path that were used for routing. In this case, let us assume that the User Service already knows that it is dealing with users, thus the /users part of the path can be left off. (This is not a recommended practice, only an example.)
Removing the prefix used for routing is a fairly common operation, and the place where it can be done (as well as many other operations) is inside the RouteAction. The RouteAction is the same place where the target cluster to route to was chosen. Let’s get rid of that routing prefix using the documented option prefix_rewrite.
static_resources:
  listeners:
    - address:
        ...
      filter_chains:
        - filters:
          - name: envoy.filters.network.http_connection_manager
            typed_config:
              "@type": type.googleapis.com/envoy.extensions.filters.network.http_connection_manager.v3.HttpConnectionManager
              stat_prefix: ingress_http
              route_config:
                name: api
                # An array of virtual hosts which will compose the routing table.
                # https://www.envoyproxy.io/docs/envoy/latest/api-v3/config/route/v3/route_components.proto#envoy-v3-api-msg-config-route-v3-virtualhost
                virtual_hosts:
                  - name: backend
                    # A list of domains, e.g. *.foo.com, that will match this virtual host.
                    domains:
                      - "*"
                    routes:
                      # This route must come before "/users" to match.
                      - match:
                          prefix: "/users/"
                        route:
                          prefix_rewrite: "/"
                          cluster: user_service
                      - match:
                          prefix: "/users"
                        # The routing action to take if the request matches the conditions.
                        # https://www.envoyproxy.io/docs/envoy/latest/api-v3/config/route/v3/route_components.proto#envoy-v3-api-msg-config-route-v3-routeaction
                        route:
                          prefix_rewrite: "/"
                          cluster: user_service
                      - match:
                          prefix: "/cards"
                        route:
                          cluster: card_service
              http_filters:
                ...
  clusters:
    ...
Code language: PHP (php)
If we re-start our envoy server, we will see that the request routed to our service looks different now.
$ curl -D - http://localhost:8080/users/1234
$ curl -D - http://localhost:8080/users

# We see in Terminal 1
GET /1234 HTTP/1.1
GET / HTTP/1.1Code language: PHP (php)
Conclusion
Resuming from where we left off in Envoy part 1, we added the ability to present to our users a single API interface that can route requests, based on the URL path, to more specialized services. To demonstrate this concept, simple shell scripting tools like netcat and echo were used to create HTTP servers that substituted for real services. In this article, all the servers happened to be on the same host, however, in your company, the different servers will likely be either on different physical computers, different pods in a Kubernetes cluster, or different Tasks in AWS ECS.
As this series continues, further concepts will be explored including TLS termination, local rate limiting, global rate limiting, and more.
One Response
Thank you for writing about envoy in easy words and explaining with examples. Its concise step-by-step guide.